What does it take to add Copilot to Obsidian?

Ever since I got access to GitHub Copilot, I have been truly amazed by its capabilities. It continuously keeps feeding me possible completions for my code and text. They might not always be perfect, but they are often good enough to be used as a starting point and prevent me from suffering from the white page syndrome. I’m also an avid user of Obsidian, a note-taking application, where I often encounter the same white page syndrome. This often resulted in me either writing my longer notes in my IDE using Copilot or procrastinating and not writing the note (or blog) at all. The engineer in me saw this as a challenge, which resulted in the Obsidian Copilot plugin. Like the name suggests, this plugin adds Copilot-like auto-completion to Obsidian with the help of the OpenAI API, which looks something like this:

An example where the plugin suggests a Latex formula based on all the text in the note.
You might be wondering what does it take to implement a Copilot-like plugin for Obsidian? It turns out that all comes down to three questions:
- How do we obtain completions?
- How do we ensure that the obtained completions are the type of completions we want?
- How do we design a maintainable software architecture for such a plugin?
Obtaining completions
The thing that makes Copilot so powerful is that its predictions take the text before and after your cursor into account.
If you know a bit about transformers, you might think that is a bit strange since autoregressive transformers like GPT-3 only take previous tokens into account in their predictions.
So, how do you force an autoregressive transformer-based model to take the text before and after the cursor into account in its prediction?
This problem is solvable with some clever, prompt engineering.
We tell the model that we give it some text with the format <text_before_cursor> <mask/> <text_after_cursor>, and its task is to respond with the most logical words that can replace the <mask/>.
In the plugin, we do this using the following system prompt:
Your job is to predict the most logical text that should be written at the location of the `<mask/>`.
Your answer can be either code, a single word, or multiple sentences.
Your answer must be in the same language as the text that is already there.
Your response must have the following format:
THOUGHT: here you explain your reasoning of what could be at the location of `<mask/>`
ANSWER: here you write the text that should be at the location of `<mask/>`
We then provide the model with the text before and after the cursor, which might look something like this:
# The Softmax <mask/>
The softmax function transforms a vector into a probability distribution such that the sum of the vector is equal to 1
The model will then response with something like this:
THOUGHT: `<mask/>` is located inside a Markdown headings. The header already contains the text "The Softmax" contains so my answer should be coherent with that. The text after `<mask/>` is about the softmax function, so the title should reflect this.
ANSWER: function
The text after THOUGHT: allows the model to reason a bit about the context around the cursor before writing the answer in the ANSWER: section.
This is a prompt engineering trick called Chain-of-Thought.
The idea here is that if a model explains its reasoning, it will be more likely to write a coherent answer since it gives the attention mechanism more guidance.
For our use case, this works remarkably well.
We are mainly interested in the ANSWER: section since contains the actual completion.
Thanks to the ANSWER: prefix, we can extract this text using regex, which is exactly what we do in the plugin.
Making the model context-aware
We now have a way to obtain completions from the model thanks to the system prompt above. However, when I used the above system prompt, I noticed that the model often generated generic text completions independent of the cursor location. For example, even in Python code blocks, the model preferred to generate English text completions instead of Python code. This is not what we want. We humans expect different types of completions in different cursor locations, for example:
- If the cursor is inside a Python code block, we expect a completion with Python code.
- If the cursor is inside a math block, we expect a completion with latex formulas.
- If the cursor is inside a list, we expect a new list item.
- If the cursor is inside a heading, we expect a new heading that represents the paragraph’s content.
- Etc.
You can probably think of many more examples and expectations. Encoding all these expectations in the system prompt would make it very long and complex. Instead, it is easier to use a few-shot example approach. In this approach, we give the model some example input and output pairs that implicitly show the model what we expect in the response for the given context. For example, when the cursor is inside a Math block, we give the following example input:
# Logarithm definition
A logarithm is the power to which a base must be raised to yield a given number.
For example $2^3 =8$; therefore, 3 is the logarithm of 8 to base 2, or in other words $<mask/>$.
Combined with the following example output:
THOUGHT: The <mask/> is located inline math block.
    The text before the mask is about logarithm.
    The text is giving an example but the math notation still needs to be completed.
    So my answer should be the latex formula for this example.
ANSWER: 3 = \log_2(8)
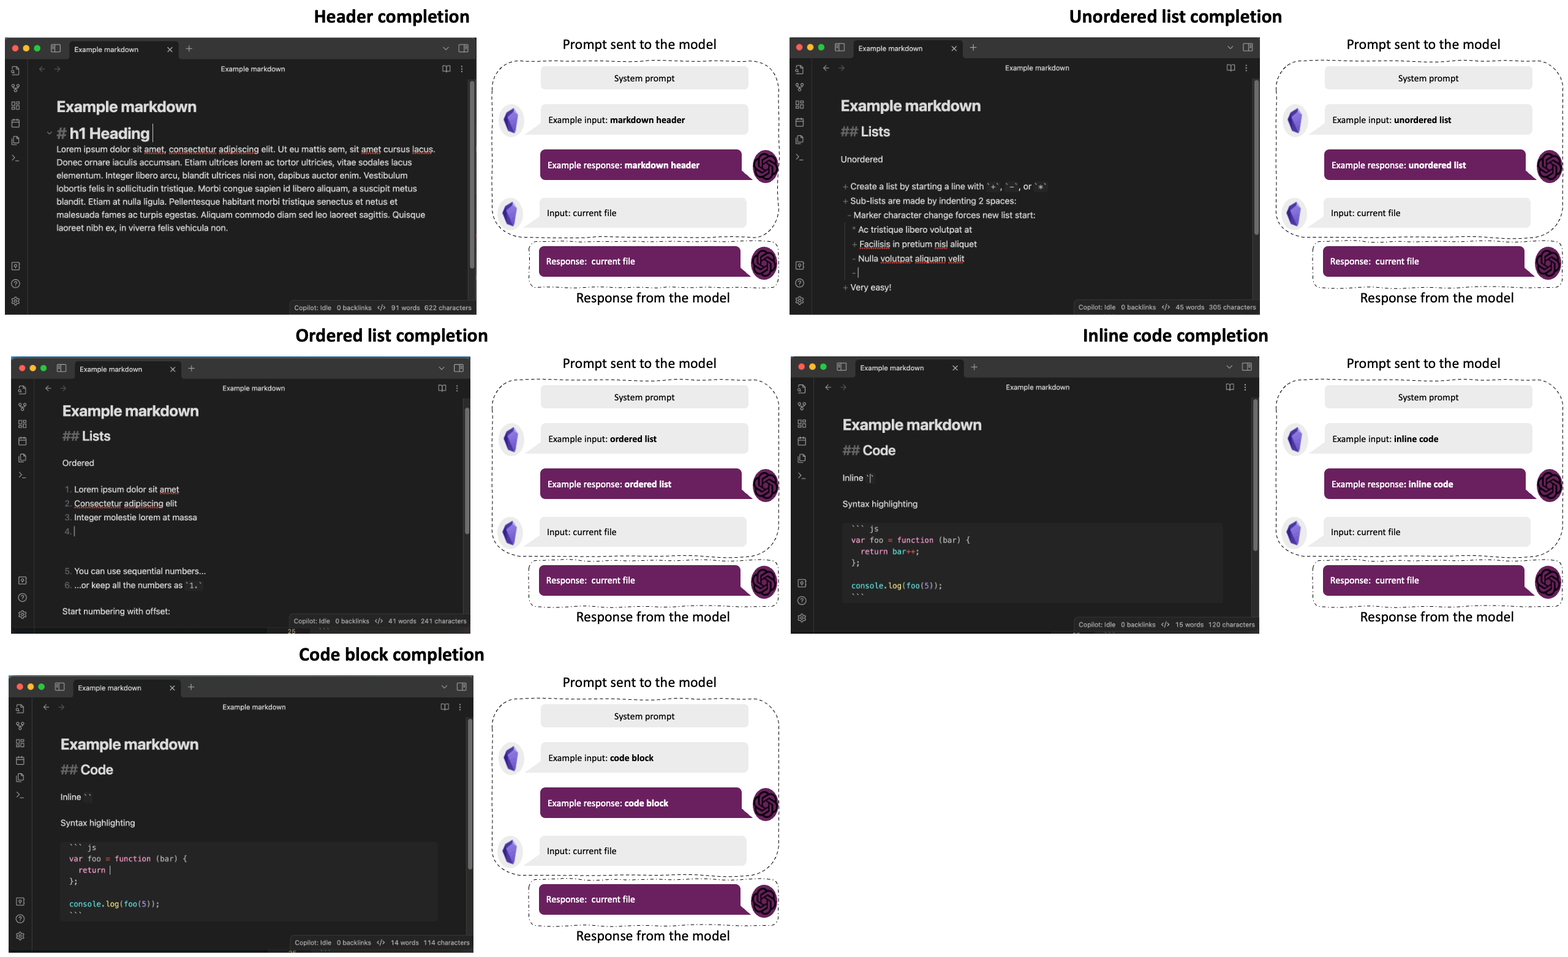
Examples like this allow us to implicitly show the model what kind of responses we expect in specific cursor locations. However, they also have another big advantage. The prompt and examples can be dynamic and context-specific. For example, if the cursor is inside a Code block, we only include the few-shot examples related to code blocks. If the cursor is inside a math block, we only select the few-shot examples related to math and latex formulas, etc. This way, we can make the model context-aware without encoding all the context into one long system prompt. Allowing us to reduce the prompt length, complexity, and inference costs.

Some examples of how the prompt changes dynamically based on the cursor’s location.
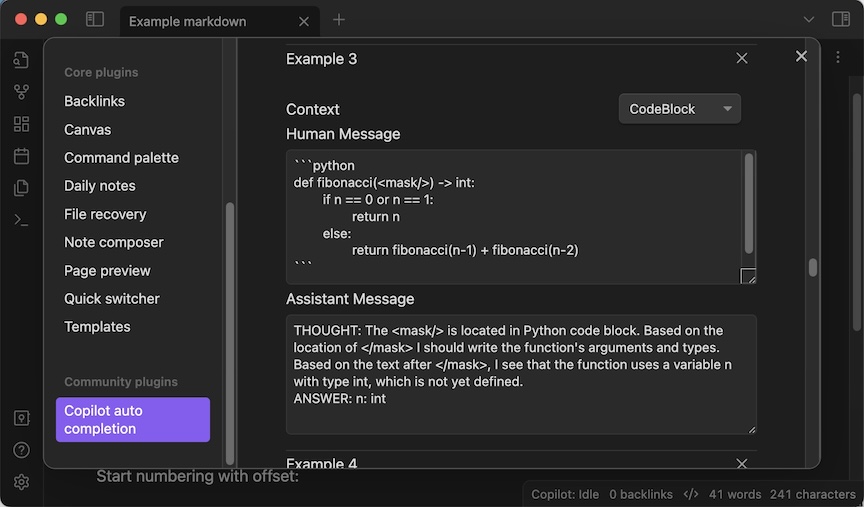
Another nice side effect of this few-shot example approach is that it allows users to customize the type of completions they expect. Maybe a user wants the model to write in their native language? Or the user might want the model to generate to-do list tasks in their specific style. All they need to do is write an example input and model response for a given context, and the model will learn to generate tasks in your style. This makes the model very flexible and customizable to the user’s needs. That is why the plugin allows users to edit the existing few-shot examples or add their own via the settings menu.

The settings menu where users can add or change few-shot examples per cursor context.
Plugin architecture
We now have a way to obtain completions from the model and a method to ensure that the model generates the type of completions we expect.
Now, a big question remains: how do we integrate this into an IDE-like Obsidian without making the code needlessly complex?
The code for a plugin like this can quickly become complex because it must listen to many different events and perform different actions for the same event in different situations.
For example, when the user presses the Tab key, a lot of things can happen:
- If the plugin shows a completion, the plugin should insert the completion.
- If the user is just typing, the plugin should do nothing to let the default Obsidian behavior take over.
- If a prediction is queued, the plugin should cancel the prediction since the prediction context is outdated while still letting the default Obsidian behavior take over.
- Etc.
As you can see, with just this single event as an example, the plugin’s behavior can quickly become complex while we still need to handle many more events. If you are not careful, you will end up with a highly complex plugin filled with if-else statements that are impossible to maintain and extend. Luckily, this problem has a solution: the state machine design pattern.
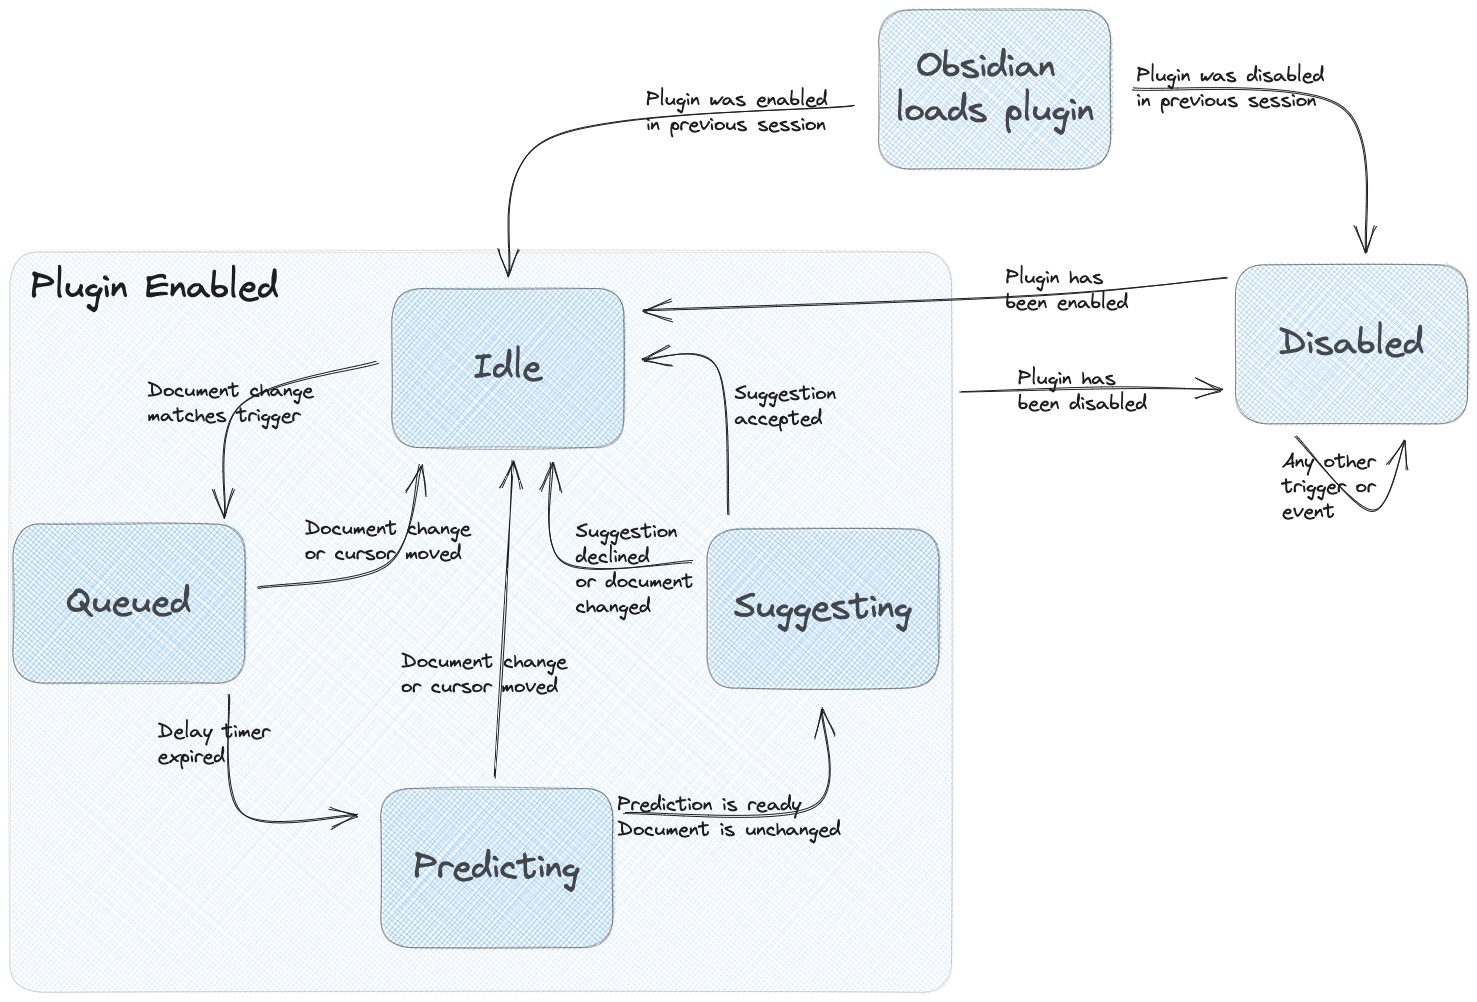
When you think about it, the plugin has five different situations (or states) it can be in:
- Idle: The plugin is enabled, awaiting a user event that triggers a prediction.
- Queued: A trigger has been detected, and the plugin waits for the trigger delay to expire before making a prediction. This delay is needed to minimize the number of API calls (and inference costs).
- Predicting: A prediction request to the API provider and is waiting for the response.
- Suggesting: A completion has been generated and shown to the user, who can accept or reject it.
- Disabled: The plugin is disabled, and all events are ignored.
Depending on the event that occurred, the plugin will transition from one state to another, as shown in the figure below.

All the possible plugin states and transitions.
The big advantage of this approach is that we group all the state-specific behavior code in one place.
For example, all the idle state-specific behavior code is grouped in the IdleState class.
This code is much easier to understand and reason about than many, possibly nested, if-else statements.
Another big advantage is that you can visualize the plugin’s behavior in a state diagram like the one above, making it easier to explain the code’s behavior to new developers.
These things make the plugin’s codebase much easier to maintain and extend.
Wrapping up
You now have a basic understanding of how the Obsidian Copilot plugin works and what it took to build it. Now, you might wonder, “How well does it work?” and “Does it really help avoid the white page syndrome?” Of course, I used this plugin to help me write this blog post, and since you are reading this, I think it is safe to say that it helped me avoid the white page syndrome. So, it might be worth giving it a try yourself. You can find the plugin in the Obsidian community plugin store and the code on GitHub. Enjoy!
